Sunday, May 4, 2008

Interval Shooting (Script Based)

Using the built-in scripting feature of CHDK, some interesting results can be had by executing a script for something specific. In this tutorial, I will attempt to go through the process of using an interval or time lapse script.

Be sure you have the INTERVAL.BAS script. If you don't, download it here: Sample Scripts (just download the file mentioned above for now)

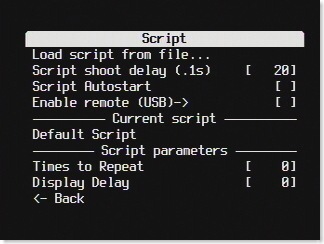
  • Open the <ALT> menu and select Script Parameters to begin. Select Load script from File...
    CHDKMenu019
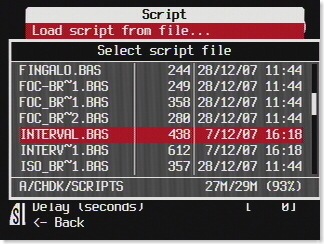
  • When the file browser opens, select the INTERVAL.BAS file.
    intshoot01
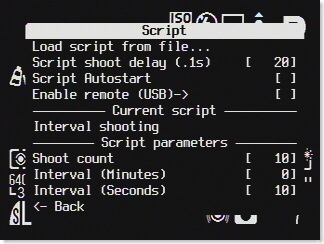
  • When the script parameters screen returns, it will show the parameters that the loaded script requires in the bottom section of the screen.
    intshoot02
  • Shoot count - This is the number of photos you want taken. I personally don't recommend setting up the camera to do things like photographing the entire lifecycle of a flower for example, because this is taxing on the batteries.
  • Interval (Minutes) - This the the number of minutes before the next shot. Leave as 0 if you only want to use seconds.
  • Interval (Seconds) - This is the number of seconds between shots. Since, by the screen above, I have 10 shots every 10 seconds, I will need to leave the camera for 1 minute and 40 seconds (100 seconds / 60 seconds = 1 min 40 sec).
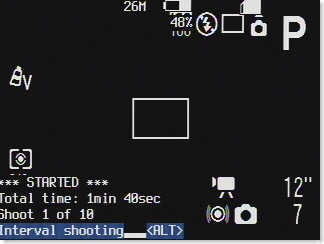
  • Press menu to return to the main screen, but do not press the alt button as you'll want to be in <ALT> mode. You will see the name of your script at the bottom of the screen to the left of the <ALT> word. Press the shutter to begin executing the script with the given parameters.
    intshoot09
  • Every 10 seconds, the camera will take a photo automatically. It is also good to note, it will use the current settings of the camera. If you were in manual mode and had the shutter speed set and the aperture set, it will use those settings.
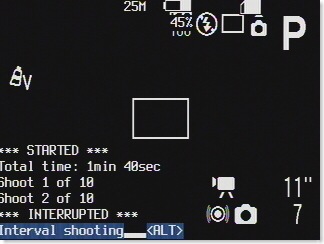
  • At anytime, if you need to stop the script from executing, you can press the shutter again and it will stop.
    intshoot12

I hope this tutorial helps, and feel free to post questions in the comments area below.

Quote of the day:
When I was younger, I could remember anything, whether it had happened or not. - Mark Twain

Tuesday, April 29, 2008

RAW Parameters Explained

RAW File options

Save RAW

This is a toggle that allows you to enable saving to a RAW file. RAW files for our camera (S5) are 10.1 MB in size and take an additional 2.5 seconds to save each time the shutter is pressed. I recommend only enabling it when you need it.

Noise Reduction

This option allows you to specify noise reduction on, off or auto. When on, the program grabs a picture of a black screen it generates and uses that to filter noisy pixels in the image. Auto tries to decide if it needs to, and may be based on ISO setting.

Only First RAW in Series

This option allows you to specify whether just the first photo in a continuous shooting mode generates a RAW file or if all of them do. If this option is enabled, continuous shooting speed is greatly reduced. This also affects the bracketing shots.

RAW File in Dir with JPEG

This option, when enabled, saves the RAW file in the same folder as the JPEG generated by the camera. This allows you to easily find the RAW file. If disabled, it saves all RAW files in one folder.

RAW File Prefix

The text to prefix the name of the RAW file. This does not affect the file internally and can be set to anything available in the list.

RAW File Extension

The extension of the RAW filename. CRW and CR2 are standard Canon RAW file extensions, whereas the others are there as options. CRW is an old Canon RAW extension name and CR2 is the 2nd version of the RAW format.

RAW Develop

This option allows you to specify a RAW file to generate into a jpg file. A file browser will show, select the CRW file you'd like to develop, press set and take a photo (it doesn't get saved). The settings of the photo you took will be applied to the CRW and saved to a jpg file that you can view on camera.

CHDK Scripts

Though CHDK provides a robust set of tools out of the box, some things it provides are best left to scripting for greater control and customization. That said, using the scripting functions is a simple process and can prove to be invaluable. You can do bracketing (the camera, by default, only allows a maximum of 2 EV's and 3 shots), motion detection, and more. Below is a tutorial on how to load a script, set its paramters and get it going.
  • To get to the scripting, select scripting parameters from the main menu;
  • The main script screen always shows the last loaded script and its parameters in the last section;
  • To load a script, select Load Script from File;
  • A file browser opens to allow you to select the script file. The scripts are a loose similarity to BASIC and therefore have a .bas extension. The ~1 in the files are just because the filename is too large, so it shortens it;
  • I selected the MD_TEST2.BAS file. This is a motion detection test file;
  • Once the file is loaded (by pressing SET on your camera after selecting the file), the main screen returns and shows the parameters required as defined in the script itself. Set the options as desired (a tutorial on motion detection to come soon), then press the menu button on your camera. You'll notice it shows the script name in the bottom left of the screen (in rec mode, not shown in playback mode). Without exiting ALT mode, press the shutter button to execute the script and it will run;

CHDK Menus

  • Boot screen:
  • ALT mode:
  • Main Menu:
  • Operations Menu:
  • Bracketing in Continous Mode:
  • Custom Auto ISO:
  • OSD Options:
  • Grid Lines:
  • Misc Values 1:
  • Misc Values 2:
  • DOF Calculator:
  • RAW Showing Settings:
  • Battery Showing Settings:
  • File Showing Settings:
  • Clock Settings:
  • RAW Options:
  • Histogram Options:
  • Zebra Options:
  • Script Options:
  • Visual Settings 1:
  • Visual Settings 2:
  • Miscellaneous Options:
  • Text File Reader:
  • Games:
  • Debug:

Installing CHDK to your S5 (1-4 GB SD Cards only, not SDHC)

  • Download CHDK from CHDK for S5 Downloads and save it to your desktop for easy access.
  • Download the bootable.zip file to make your SD card bootable for the camera.
  • Format your card in your camera to clear it off.
  • Remove your SD card from your camera and insert it into your card reader on your computer. This won't work if the card is left in the camera and the camera connected. The card must be removed.
  • Unzip the bootable.exe (you can ignore the .c file) to your card. Also, note the drive letter for your card.
  • Start a command prompt by going to Start/All Programs/Accessories/Command Prompt. Navigate to your card's drive letter by type the drive letter, a colon and press enter. (ie. f: <enter>)
  • Type bootable [drive]: where [drive] is replaced by your card's drive letter.
  • Now your card is bootable for the camera.
  • Extract the DISKBOOT.BIN file to your card. Do not extract it to any folders on your card.
  • Remove your card from the reader and make sure you slide the read only switch on the card to read only or lock.
    cardlock
  • Reinsert it into your camera and turn it on. If you see a blue box pop up and extra information showing on your screen, you've done it correctly.